Easy No-Knead Focaccia with Rosemary and Sea Salt
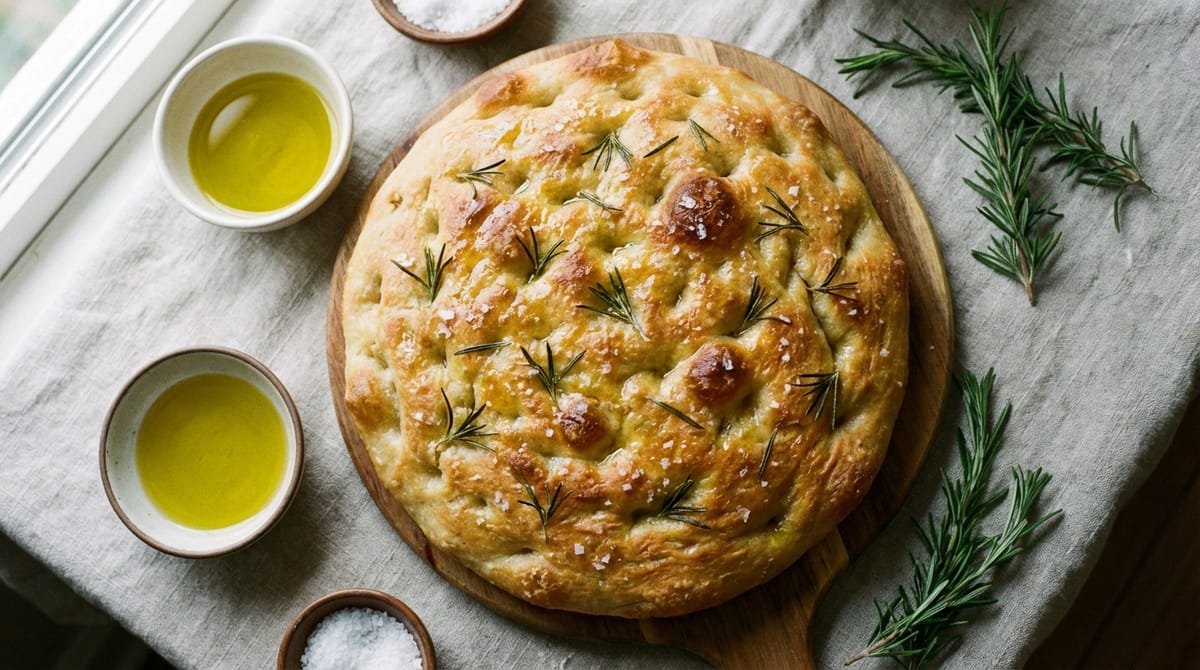
Focaccia stands as one of the most forgiving and rewarding breads you can make at home. This Italian flatbread, with its signature dimpled surface, crispy golden crust, and pillowy interior, has captivated home bakers for generations. The traditional version requires extensive kneading to develop gluten structure, but the no-knead method has revolutionized how we approach this classic bread, making it accessible to anyone with a bowl, a pan, and a bit of patience.
The artistry of no-knead focaccia lies in time rather than technique. By allowing the dough to ferment slowly, often overnight, the gluten develops naturally through a process called autolysis. This extended fermentation not only creates the ideal texture but also develops complex flavors that rival any bakery loaf. When topped with fresh rosemary and flaky sea salt, the result is a bread that's equally at home alongside a bowl of soup, sliced for sandwiches, or simply torn apart and dipped in quality olive oil.
What makes this recipe particularly appealing is its flexibility. The dough can be mixed in minutes, left to rise on your schedule, and even refrigerated for up to two days before baking. This means you can fit fresh, homemade bread into even the busiest lifestyle without compromising on quality or flavor.
The Complete No-Knead Focaccia Recipe
This recipe yields one 9x13-inch pan or two 9-inch round focaccias, serving approximately 8-10 people as a side dish or 4-6 as a main component.
Ingredients
- 4 cups (500g) all-purpose flour or bread flour
- 2 teaspoons instant yeast (or 2¼ teaspoons active dry yeast)
- 2 teaspoons fine sea salt
- 2 teaspoons sugar or honey
- 2 cups (475ml) warm water, approximately 110°F (43°C)
- 4 tablespoons olive oil, divided (plus extra for the pan)
- 2-3 tablespoons fresh rosemary, roughly chopped
- Flaky sea salt for topping
Instructions
- In a large mixing bowl, combine the warm water, sugar, and yeast. Let sit for about 10 minutes until the mixture becomes foamy, indicating the yeast is activated. If using instant yeast, you can skip this step and add it directly with the flour.
- Add half of the flour to the yeast mixture and stir with a spatula or wooden spoon until absorbed. Add the remaining flour and fine sea salt, mixing until no dry patches remain and a sticky, shaggy dough forms.
- Pour 2 tablespoons of olive oil over the dough and mix until incorporated. The dough should be soft and slightly tacky but cohesive.
- Cover the bowl tightly with plastic wrap or a damp kitchen towel and let rise at room temperature for 1½ to 2 hours, or until doubled in size.
- After the initial rise, wet your hands with water and perform a stretch and fold: reach under one side of the dough, stretch it upward, and fold it over to the center. Rotate the bowl 90 degrees and repeat on all four sides. Cover and let rest for 20 minutes.
- Repeat the stretch and fold process 2-3 more times with 20-minute rests between each. This builds structure without traditional kneading.
- At this point, you can either proceed with baking or transfer the dough to a greased bowl, cover tightly, and refrigerate for up to 2 days. If refrigerating, remove the dough 2-3 hours before baking to bring it to room temperature.
- Generously coat a 9x13-inch baking pan (or two 9-inch round pans) with olive oil, ensuring the bottom and sides are well-greased.
- Using a bowl scraper or your hands, gently transfer the dough to the prepared pan. Let it rest for 30 minutes to relax the gluten.
- With oiled fingers, gently stretch and press the dough to fill the pan evenly. If it resists, let it rest another 10 minutes and try again. Cover lightly and let rise for 30-40 minutes until puffy and nearly doubled.
- Preheat your oven to 390-430°F (200-220°C). The higher temperature creates a crispier crust.
- Once risen, drizzle the remaining 2 tablespoons of olive oil over the dough surface. Using your fingertips, press firmly into the dough to create deep dimples across the entire surface.
- Sprinkle the chopped fresh rosemary evenly over the top, pressing it gently into the dimples. Finish with a generous sprinkle of flaky sea salt.
- Bake for 20-40 minutes (depending on your oven temperature and pan size) until the focaccia is deeply golden brown on top and the edges are crispy. The internal temperature should reach about 200°F (93°C).
- Remove from the oven and let cool in the pan for 5-10 minutes before transferring to a wire rack or cutting board. Serve warm or at room temperature.
Understanding the No-Knead Method
The no-knead technique revolutionized home bread baking by eliminating the most labor-intensive step while producing superior results. Traditional bread making requires vigorous kneading to align gluten proteins and create the elastic network that gives bread its structure. The no-knead method achieves the same result through extended fermentation and gentle folding.
When flour meets water, gluten proteins naturally begin to form bonds. Given sufficient time, these bonds organize themselves into a strong network without any mechanical manipulation. The stretch-and-fold technique used in this recipe accelerates this process slightly by encouraging gluten alignment, but the bulk of the work happens during the long, slow rise. This extended fermentation also allows enzymes in the flour to break down starches into sugars, which feed the yeast and create more complex flavors.
The wet, sticky consistency of the dough is intentional. Higher hydration levels contribute to the open, airy crumb structure characteristic of great focaccia. While this dough may feel unwieldy compared to traditional bread doughs, resisting the urge to add extra flour ensures you'll achieve that signature light texture with irregular air pockets throughout.
The Role of Olive Oil in Focaccia
Olive oil is not merely an ingredient in focaccia - it's the soul of the bread. Quality matters significantly here, as the oil's flavor permeates every bite. Extra virgin olive oil provides fruity, peppery notes that complement the rosemary and enhance the overall taste profile. The oil serves multiple functions throughout the recipe, each contributing to the final product's success.
During mixing, olive oil enriches the dough, adding flavor and creating a tender crumb. The generous coating in the baking pan serves a dual purpose: it prevents sticking while also frying the bottom and edges of the dough as it bakes, creating those irresistibly crispy, golden sections. The final drizzle before baking pools in the dimples, creating pockets of concentrated flavor and contributing to the bread's characteristic glossy appearance.
Don't skimp on the oil in the pan. What might seem excessive actually creates the focaccia's defining textural contrast between the crispy exterior and soft interior. As the bread bakes, the oil conducts heat directly to the dough, essentially shallow-frying the bottom while the top bakes in dry heat.
Choosing and Preparing Your Toppings
Fresh rosemary and flaky sea salt represent the classic focaccia topping combination, but understanding how to prepare and apply them makes the difference between good and exceptional results. Fresh rosemary is essential - dried rosemary lacks the aromatic punch and can become unpleasantly sharp when baked directly on bread. Strip the leaves from woody stems and chop them roughly to release their oils. Pressing the rosemary into the dimples helps it adhere and prevents burning.
Flaky sea salt, such as Maldon or fleur de sel, provides bursts of salinity and a pleasant textural contrast. These salt crystals are larger and more irregular than table salt, creating pockets of intense flavor rather than uniform saltiness. Apply the salt just before baking so it doesn't dissolve into the dough. Be generous - focaccia can handle more salt than you might expect, and the flaky variety is less intense than fine salt by volume.
While rosemary and sea salt are traditional, focaccia serves as an excellent canvas for other toppings. Cherry tomatoes, thinly sliced red onions, olives, garlic cloves, or even grapes can be pressed into the dimples before baking. Some bakers create a baby starter using bread flour, yeast, and water fermented for at least 12 hours, which adds another layer of flavor complexity to the base dough.
Timing and Temperature Considerations
Successful focaccia depends heavily on proper timing and temperature management throughout the process. Water temperature for activating yeast should hover around 110°F (43°C) - warm to the touch but not hot. Water that's too cool won't activate the yeast effectively, while water above 120°F can kill it entirely. If you don't have a thermometer, aim for water that feels like a comfortable bath.
Room temperature during rising significantly affects timing. In a warm kitchen (75-80°F), the initial rise might take only 90 minutes, while a cooler environment (65-70°F) could require 2-3 hours. The dough is ready when it has doubled in volume and shows visible air bubbles on the surface. Don't rush this stage - under-proofed dough produces dense, heavy focaccia.
The overnight refrigeration option offers remarkable flexibility and flavor development. Cold fermentation slows yeast activity while allowing enzymes to continue working, resulting in more complex flavors and improved texture. This method also makes the dough easier to handle and shape. Remember to remove refrigerated dough 2-3 hours before baking to allow it to come to room temperature and complete its final rise.
Oven temperature varies across recipes, ranging from 390°F to 430°F. Higher temperatures create a crispier, more deeply colored crust, while moderate temperatures ensure even baking throughout thicker focaccias. Most home bakers find success at 400-410°F, which balances crust development with thorough interior baking. Position your oven rack in the lower third to encourage bottom crisping.
Troubleshooting Common Issues
Even with a forgiving recipe like no-knead focaccia, occasional challenges arise. Dense, heavy texture typically results from insufficient rising time or using expired yeast. Always check your yeast's expiration date and proof it in warm water to confirm it's active before proceeding. If your kitchen is particularly cool, consider placing the rising dough in a turned-off oven with the light on or near a warm appliance.
If your focaccia spreads too thin in the pan or lacks structure, the dough may be over-hydrated or under-developed. Ensure you're measuring flour correctly - spoon it into measuring cups and level off rather than scooping directly from the bag, which compacts the flour and results in less than the recipe requires. The stretch-and-fold steps are crucial for building structure, so don't skip them even though the method is called "no-knead."
A pale, soft crust indicates insufficient oven temperature or inadequate oil. Verify your oven temperature with an oven thermometer, as many home ovens run cooler than their settings indicate. Make sure you're using enough olive oil in the pan and on top of the dough - this isn't the time for restraint. The oil should visibly pool in the dimples and coat the entire surface.
Burnt rosemary or overly dark spots can occur at higher baking temperatures. If using a very hot oven (above 420°F), consider adding the rosemary halfway through baking or pressing it deeper into the dimples where the dough protects it. You can also tent the focaccia with foil during the last few minutes if it's browning too quickly while the interior finishes baking.
Storing and Serving Suggestions
Fresh focaccia tastes best within hours of baking, when the contrast between crispy exterior and tender interior is most pronounced. However, proper storage extends its enjoyment for several days. Once completely cooled, wrap the focaccia tightly in plastic wrap or store in an airtight container at room temperature for up to 2 days. The crust will soften somewhat, but the bread remains delicious.
To refresh day-old focaccia, wrap it in foil and warm in a 350°F oven for 10 minutes, then unwrap and bake for an additional 3-5 minutes to re-crisp the crust. Alternatively, slice it and toast individual pieces. Focaccia also freezes exceptionally well - wrap cooled bread tightly in plastic wrap, then foil, and freeze for up to 3 months. Thaw at room temperature and refresh in the oven as described above.
Serving possibilities extend far beyond a simple side bread. Slice thick pieces horizontally to create sandwich bread with incredible flavor and texture. The dimpled surface holds spreads, oils, and vinaigrettes beautifully. Cut focaccia into strips for dipping in olive oil, balsamic vinegar, or marinara sauce. It pairs naturally with Italian meals but complements soups, salads, and cheese boards equally well. Some enjoy it for breakfast, topped with butter and jam, or as a base for bruschetta-style toppings.
Conclusion
No-knead focaccia with rosemary and sea salt represents the perfect intersection of simplicity and sophistication in home baking. By replacing labor-intensive kneading with patient fermentation, this method delivers bakery-quality results without requiring advanced skills or specialized equipment. The dough's flexibility accommodates various schedules through same-day or overnight preparation, making fresh bread achievable even for busy households.
The keys to success are straightforward: use quality ingredients, especially good olive oil; trust the process and allow adequate rising time; don't fear the wet, sticky dough; and be generous with oil and salt. The stretch-and-fold technique builds just enough structure while maintaining the high hydration that creates focaccia's signature airy crumb. Proper dimpling creates pockets for oil and toppings while ensuring even baking.
Once you've mastered this basic recipe, focaccia becomes a versatile foundation for creativity. Experiment with different herb combinations, add roasted garlic or caramelized onions, or try unexpected toppings like thinly sliced potatoes or fresh grapes. Each variation builds on the same reliable base, ensuring consistent success. Whether served alongside dinner, used for sandwiches, or enjoyed on its own with a drizzle of olive oil, this focaccia delivers satisfaction that far exceeds the minimal effort required to make it.
Sources
- Julie's Eats & Treats - Focaccia Recipe
- Sip and Feast - Easy No-Knead Focaccia
- Fleischmann's Yeast - No-Knead Focaccia Bread
- Food by Remi - Easy Rosemary Focaccia
- The Global Vegetarian - Rosemary Focaccia
- Jessica Rosetti - No-Knead Focaccia
- Pastry by Saloni - Easy Focaccia Bread No-Knead
- Just So Sweet - Rosemary Sea Salt Focaccia